硬件连接请参考第一节中的内容:
http://forum.banana-pi.org.cn/thread-1304-1-1.html
1.修改一下上节的 arduino代码,并重新上传:
(这里连接有一点小小的变动,将 dht11 的 DAT 引脚从Arduino 的 D2 挪动到了 A2 引脚)
#include <dht11.h>
dht11 DHT11;
#define DHT11PIN A2

void setup()
{
  Serial.begin(9600);
}

void loop()
{
  DHT11.read(DHT11PIN);

  Serial.print(" Humidity (%): ");
  Serial.print(DHT11.humidity);

  Serial.print("; Temperature (oC): ");
  Serial.print(DHT11.temperature);

  Serial.println("");
  delay(1000);
}

- 使用python读取串口数据,并保存成json格式在 /home/pi 中 建立 code 文件夹,创建 temp.py 文件, 然后再创建一个json 子文件夹
import serial
import time
import os
import urllib.request
import platform

def save_json(f, v):
   try:
   print(v)
   output = open("/home/pi/code/json/" + f, 'w')
   output.write(v)
   output.close
   except Exception as ex:
   print(str(ex))


def isWindowsSystem():
   return 'Windows' in platform.system()

if __name__ == "__main__":
   try:
   time1 = time.strftime("%Y-%m-%dT%H:%M:00",time.localtime(time.time()))
   t = 0
   if isWindowsSystem():
   print("windows")
   t = serial.Serial('com14', 9600)
   else:
   print("linux")
   t = serial.Serial('/dev/ttyUSB0', 9600)
   print(t.isOpen())

   t2_dht11 = 0  # temperature
   h2_dht11 = 0  # humidity


   for i in range(3):
   try:
   s1 = t.readline()
   s1 = str(s1, encoding = "utf-8")
   print(s1)
   s2 = s1.split(';')

   h2_dht11 = int(s2[0].split(':')[1])
   t2_dht11 = int(s2[1].split(':')[1])

   #print("%0.2f %d %d" % (t1_18b20, t2_dht11, h2_dht11) )        # ds18b20 wendu
   except Exception as ex:
   f = open("log.txt", "w")
   f.write(str(ex))
   f.close()
   print(str(ex))

   t.close()

   # temperature dht11
   if t2_dht11 >= 10 and t2_dht11 <= 50:
   json = '{"timestamp":"%s","value":%d}' % (time1, t2_dht11)
   save_json('temp2.json', json)

   # humidity dht11
   if h2_dht11 >= 0 and h2_dht11 <= 90:
   json = '{"timestamp":"%s","value":%d}' % (time1, h2_dht11)
   save_json('humidity.json', json)

   print("finished!")

   except Exception as ex:
   f = open("log.txt", "w")
   f.write(str(ex))
   f.close()
   print(str(ex))
测试代码: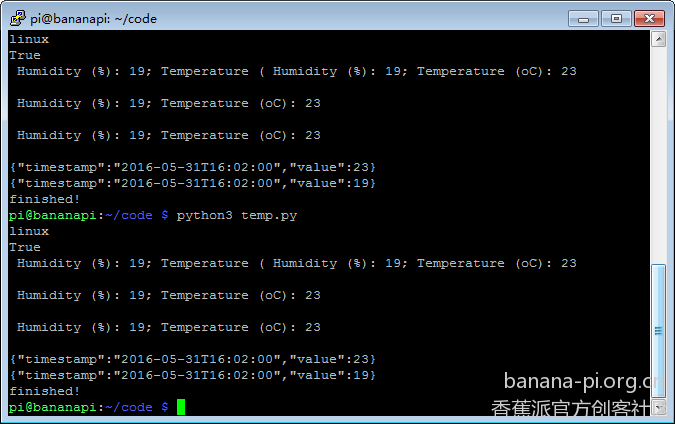
程序正确运行后会创建json 文件humidity.json{“timestamp”:“2016-05-31T16:22:00”,“value”:19}temp2.json{“timestamp”:“2016-05-31T16:22:00”,“value”:23}
2. 去 yeelink 注册账号,并建立两个传感器
3. 创建读取和上传数据的脚本在 code 中创建 yeelink.sh 脚本 (请自行修改APIKEY 以及设备和传感器ID):
sudo python3 /home/pi/code/temp.py

# temperature dht11
curl --request POST --data-binary @"/home/pi/code/json/temp2.json" --header "U-ApiKey:1bc325287fe43b6f959d760d4e7f4cbb" http://api.yeelink.net/v1.0/device/346194/sensor/385890/datapoints
rm -f /home/pi/json/temp2.json

sleep 10
# humidity dht11
curl --request POST --data-binary @"/home/pi/code/json/humidity.json" --header "U-ApiKey:1bc325287fe43b6f959d760d4e7f4cbb" http://api.yeelink.net/v1.0/device/346194/sensor/385891/datapoints
rm -f /home/pi/json/humidity.json
- 安装 curl
sudo apt-get install curl
- 测试脚本

6. 修改权限
chmod 777 –R code
- 创建自动任务
crontab –e
在最后位置输入下面的内容(每两分钟上传一次数据)*/2 * * * * /home/pi/code/yeelink.sh
我的数据查看地址http://www.yeelink.net/devices/346194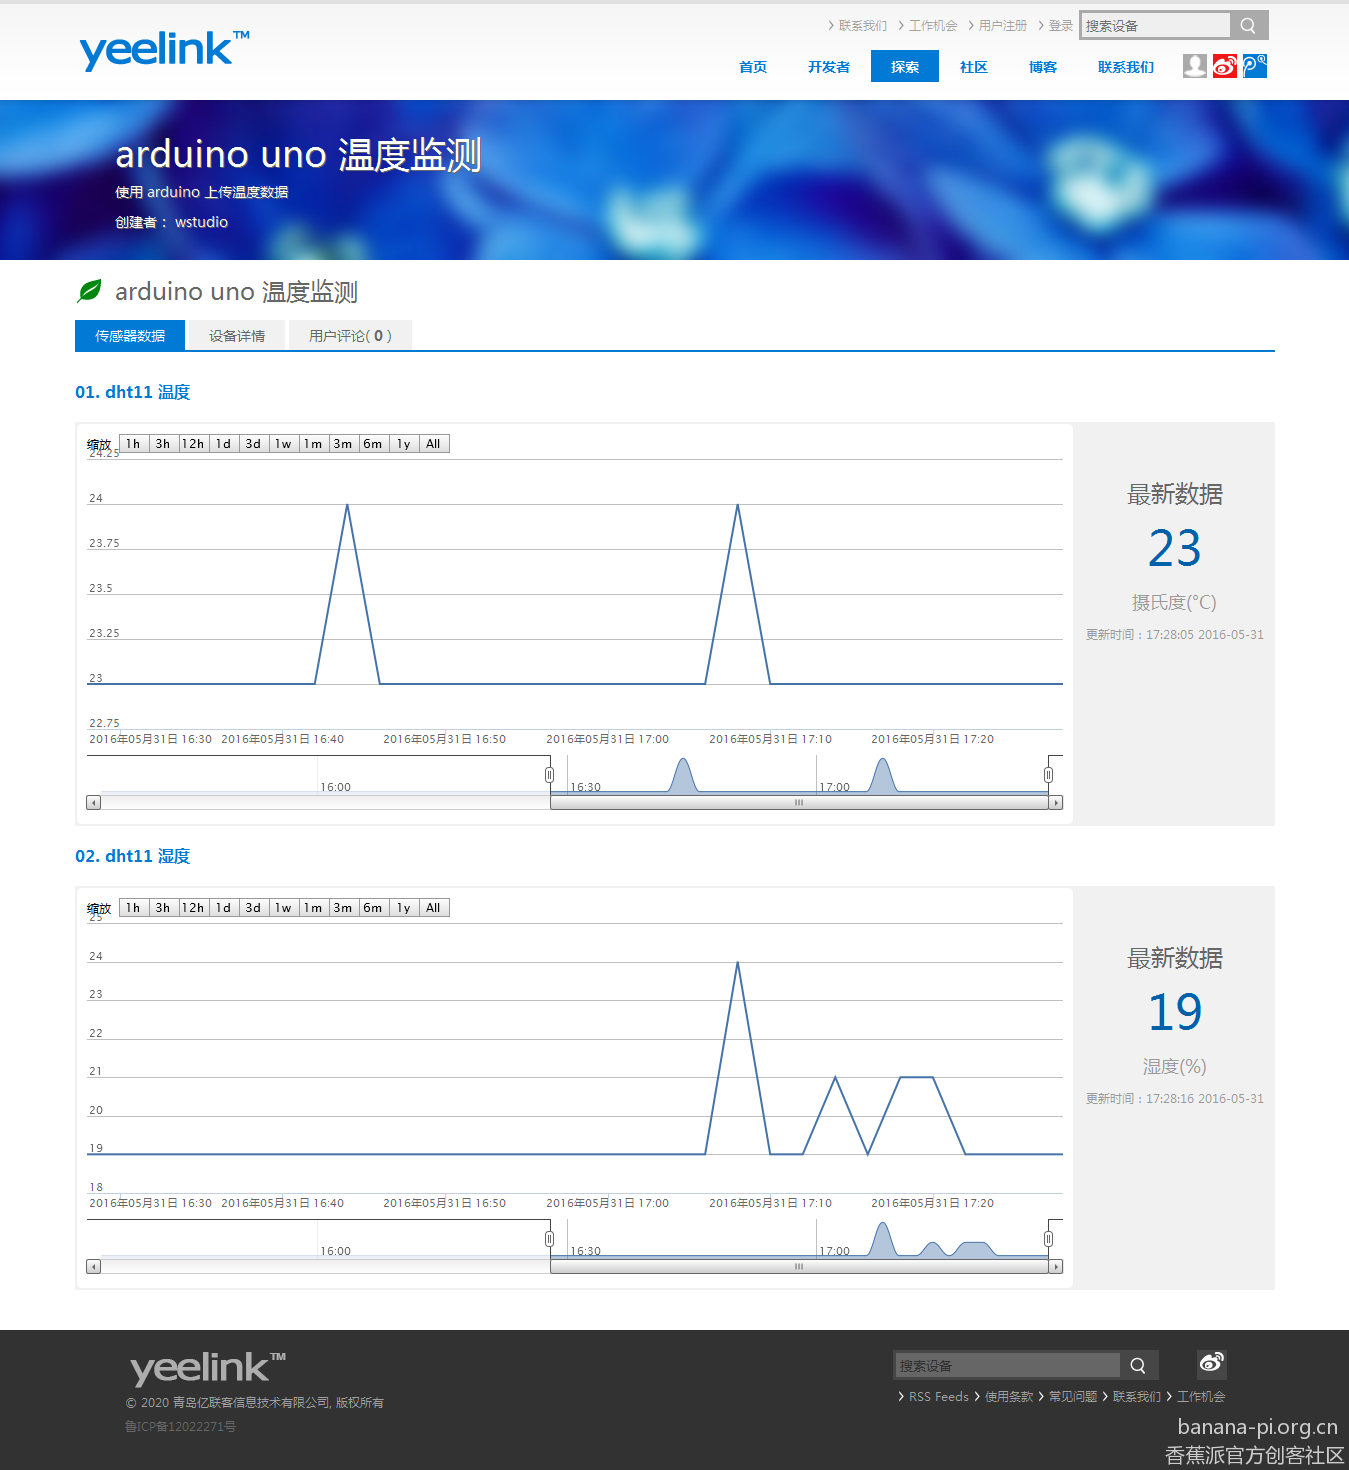
code.rar (1.08 KB)dht11_ii.rar (318 Bytes)
上一篇: 气象站_01_读取dht11的数据
下一篇: 气象站_03_搭建web服务器(nginx+php)